|
.
Step 6: Carefully remove the blue tape from the
bundle in such a way as the sheets remain in orientation. Before you re-tape the veneer stack and cut
side A, you must reinforce the apex of the triangle with veneer tape to assure
the 30 degree point will come out perfectly and not be damaged by the cut. The side of the veneer on which you place the
veneer tape must be very carefully understood.
Since you are creating a radial match, it is important to understand
that each triangular wedge will be flipped over relative to each wedge adjacent
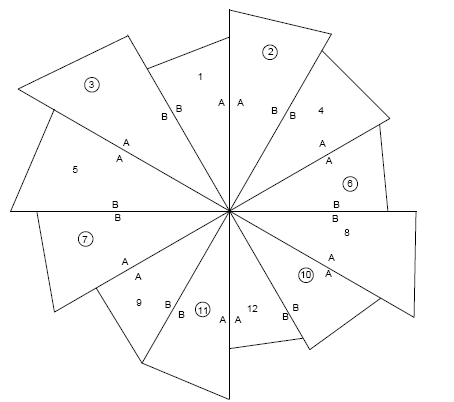
to it. The drawing at the left represents the
final orientation of all the pieces after they are taped and before the final
circle is cut:
|

|
The numbers on each wedge represent the sheet number in the
veneer stack, and the numbers shown in a circle represent wedges that are
“flipped” over. Notice how the A sides
and B sides all align with each other.
Now imagine that the side of the drawing you see above represents the
“blue tape” side and the opposite side represents the “veneer tape” side. Since this step involves protecting the apex
with veneer tape, and since we are looking at the “blue tape” side, we must put
a piece of veneer tape on the bottom side of piece 1 (as the pieces are
currently arranged in your stack.)
Similarly, we will also place a tape on the bottom side of sheet 4, 8,
12, 9, and 5 (looking clockwise at the drawing.) Since sheets 2, 6, 10, 11, 7, and 3 will be
flipped over to make the match, you will need to place the veneer tape on the
top side of each of those sheets as they currently exist in your stack. By placing them on the top side while they
are in the stack, when they are later flipped over to make the radial match,
all the veneer tape protected apex’s will end up on the veneer tape side of the
pattern. It is critical that veneer tape
not end up on the “blue tape” side of any piece since the blue tape side will
eventually become the “glue side” and must be free of any veneer tape.
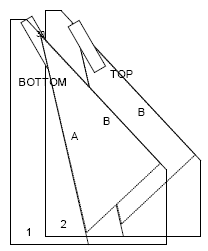
Look at the drawing to the left showing sheets 1 and 2 and think of their orientation in the drawing above.
|

