In my 1200 square foot woodworking shop, clutter can get completely out of hand without an effective strategy to control it. My current shop is my fourth in a progression of shops starting in the basement, then another basement in a different home, to an old animal barn, and finally to a dedicated, purpose-built woodworking shop. Along the way I’ve tried all kinds of strategies for keeping my shop neat and tidy, and for storing and locating tools. My earlier shops all relied on some kind of peg board system where things were hung on the walls using an assortment of (usually less than satisfactory) hanging devices designed to work with peg board. This strategy may work fine for some, but for me, it was a consistent, 30 year long battle with clutter. Woodworking shops are inherently dusty and dust seemed to settle on everything hung on the wall like a magnet. Reaching for one tool often resulted in its neighbor falling off its precarious peg board perch. But probably the worst thing was that with tools hanging on the shop walls, everything was subjected to the same moisture content as the ambient air in the shop. As seasons changed and humidity levels rose and fell, moisture attacked the metal on every tool that I hung on a wall. I resolved to fix these problems when I built my new shop and here is how I did it.
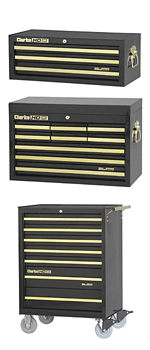 One of the first things I purchased when I moved into my new shop was a
mechanics tool cabinet from my local Menards store. This is a classic
tool cabinet consisting of three sections that stack one on top of the
other with a set of wheels on the bottom cabinet. These are available
in a wide variety of sizes, quality, and cost. I didn’t think I needed
a “top of the line” mechanics tool chest, but I wanted one that was not
cheaply made either. At the time, Menards had one that fit the bill
perfectly, but Sears also carries lots of models many of which are
reasonably priced and of good quality.
One of the first things I purchased when I moved into my new shop was a
mechanics tool cabinet from my local Menards store. This is a classic
tool cabinet consisting of three sections that stack one on top of the
other with a set of wheels on the bottom cabinet. These are available
in a wide variety of sizes, quality, and cost. I didn’t think I needed
a “top of the line” mechanics tool chest, but I wanted one that was not
cheaply made either. At the time, Menards had one that fit the bill
perfectly, but Sears also carries lots of models many of which are
reasonably priced and of good quality.
Even though a mechanic’s tool cabinet is primarily designed to store tools typically used by an auto mechanic, I’ve found that it is also perfect to store many of my woodworking tools. One drawer, for example, is completely dedicated to storing screwdrivers. I went on a screwdriver hunt one day and found every screwdriver I owned, each of which was hiding someplace in my home, my garage, my barn, and even in my pickup truck. You’d probably be amazed at the number of screwdrivers you own that are lurking somewhere, hiding from you and daring you to find them when you need them! I came up with at least 30 of various types and sizes. Now every screwdriver I own is stored in this one drawer in my mechanics tool cabinet.
I dedicated each drawer to a family of tools related together by the types of projects I typically need them for. For example, one drawer stores all my hand planes. Another holds my veneering hand tools. Another is dedicated to cabinet scrapers and all the paraphernalia you need to sharpen them. My chisels all live in one drawer. You get the idea. Every drawer contains at least one of those desiccants I was talking about earlier and, presto, in the five years I’ve been using this system my problems with rust have been eliminated. One other trick I’ve found to fight rust is to put a very light coat of Camilla oil on my steel tools like chisels and planes. The oil combined with the desiccant seems to do the trick in my Illinois location.
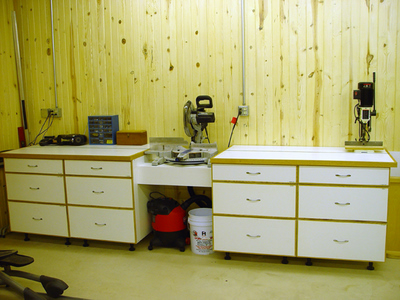
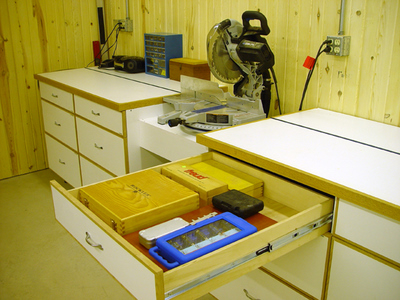
In one of his New Yankee Workshop episodes, Norm built a miter bench system that included lots of large drawers. I really liked that idea but did not particularly like Norm’s design, so I came up with my own. My system consists of four large cabinets, two for the left and two for the right side of the miter saw station. In each cabinet, I built three heavy duty drawers from Baltic birch plywood and used full extension heavy duty drawer slides to hang each drawer in a cabinet. That gave me a total of 12 large drawers adding up to a very large volume of storage space.
 |  |
McFeely’s has a nice system of containers to store various sizes of square drive wood screws. I purchased one of these for various sizes of number six, eight, and ten wood screws and these are organized in one drawer. Now I have one place to go to find any screw I own.
After all these years the thing I still struggle the most with is storing wood. Like most woodworkers, I loath throwing out that small scrap of cherry or walnut thinking some day I will find some great use for it. I have found that saving these little scraps forever fosters a hopeless situation: no matter how much space you allocate to storing scraps, you always fill it up and need more space. Accumulating more scraps than you could ever use seems to be fundamental to the nature of woodworking. Each project will always have something left over, and the more projects you do the more scrap you will have to deal with.
My solution is simple: I accumulate these scraps during the fall and winter months and every spring I take about three quarters of the scraps I’ve accumulated, select first the pieces from last year that I was sure I would use but have not, and place them in containers for camp firewood to be burned during the summer camping season. I’ve placed some very nice pieces of wood in a campfire; and sometimes it kills me to do this. But ironically, it seems that for most projects, I never really look in my scrap pile anyway!
After decades of woodworking I’ve concluded that the best place to store wood is at the lumberyard! Sure, I do from time to time purchase a pretty piece of wood that I have no current use for. These I do store in my shop where they wait for that perfect project to come along. But I try to limit myself and bring home only really, really special pieces of wood. By keeping only enough stock on hand for projects currently underway, I have greatly reduced the total amount of lumber I have to store, but there is still one more helpful thing I’ve learned I’d like to share.
Anyone who has ever attempted to work on two or more different projects
at the same time has faced the issue of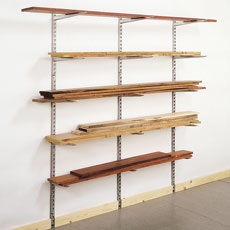 what to do with work pieces
from one project while you’re working on another project. To solve that
problem I’ve done two things. First, I purchased a very heavy duty
lumber storage system originally designed for the telephone industry.
I got mine from Woodcraft and I highly recommend it. This system is made from very thick steel and is capable of supporting
an enormous weight. Bolted to a wall, what makes the system work so
well is that the floor really carries the load and the wall just keeps
the load from toppling over. I use this lumber storage system mostly
for storing lumber for work in progress. I’ve also found that using the
very thin plastic stretch wrap available at any home center and
wrapping related pieces of a project in a bundle, I can neatly store
these bundles on the rack. I’ve found that by carefully labeling each
part in the project then bundling and grouping related parts together,
it is easy to put a project aside for weeks or months then come back to
it later and take up where you left off. But the lumber storage rack is
definitely the key to this strategy because it gives me a very handy
place to keep everything organized, off the floor, and out of harms
way.
what to do with work pieces
from one project while you’re working on another project. To solve that
problem I’ve done two things. First, I purchased a very heavy duty
lumber storage system originally designed for the telephone industry.
I got mine from Woodcraft and I highly recommend it. This system is made from very thick steel and is capable of supporting
an enormous weight. Bolted to a wall, what makes the system work so
well is that the floor really carries the load and the wall just keeps
the load from toppling over. I use this lumber storage system mostly
for storing lumber for work in progress. I’ve also found that using the
very thin plastic stretch wrap available at any home center and
wrapping related pieces of a project in a bundle, I can neatly store
these bundles on the rack. I’ve found that by carefully labeling each
part in the project then bundling and grouping related parts together,
it is easy to put a project aside for weeks or months then come back to
it later and take up where you left off. But the lumber storage rack is
definitely the key to this strategy because it gives me a very handy
place to keep everything organized, off the floor, and out of harms
way.
I’ve accumulated a large number of clamps over the years. These generally fall into three categories, Bessey parallel face bar clamps, pipe clamps, and various kinds of quick grip bar clamps. I found a brilliant solution to storing my large collection of clamps in Fine Woodworking Issue 174 in the article by Gary B. Foster: ”Convertible Clamping Workstation.” As soon as I saw that article I knew I had to build one of these for my own shop. My hat’s off to Gary Foster for engineering an ingenious solution to a common problem!
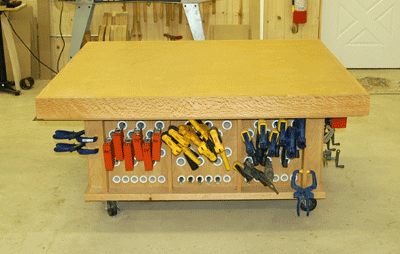 | 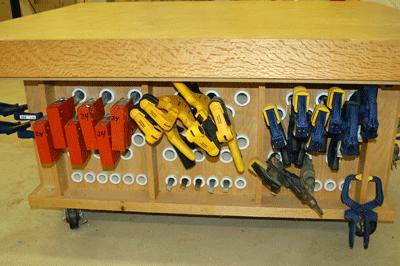 |
To make my clamp storage system even more useful, I built a torsion box to place on top of the clamp storage system. The torsion box is very flat, much lower than my other workbench, and makes an ideal assembly table. In fact, the assembly table with clamp storage is so useful and so convenient that it gets use extensively during virtually every project I build. A double bonus is that just about every clamp I own is stored just below the assembly table so when glue up time comes, my clamps are a short reach away. When I take the project out of the clamps, it is very easy to simply slide the clamp back in its storage area.